This guide provides a step by step checklist for the most common types of Dialnet connections. Dialnet is a term used by Lucent to describe any network connection which is made over a telephone line. Select the type of connection which best represents your planned use of Dialnet then follow the checklist. With the checklists Dialnet can be brought up to an operational state in the fewest number of steps.
Before continuing with this section you should be familiar with TCP/IP or IPX, wide area networking, and basic routing strategies. If you are not familiar with these concepts consult a networking primer on your type of network before proceeding.
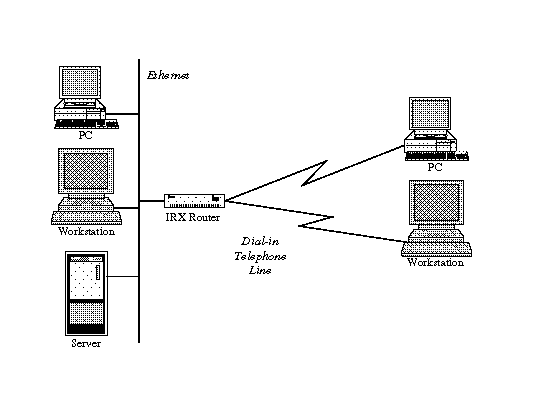
Connecting Networks - The most common uses of Dialnet are to establish wide area network connections between local area networks at geographically dispersed sites, and to allow remote hosts to access the corporate LAN. The following diagrams show three examples:
Each of these connection types is described in the following three sections. Proceed to the section which best matches your implementation requirements and follow the recommended installation steps.
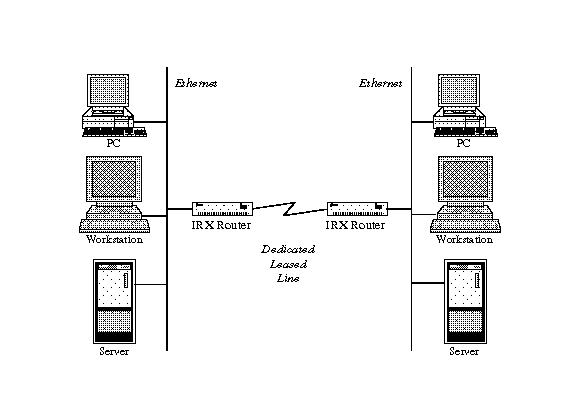
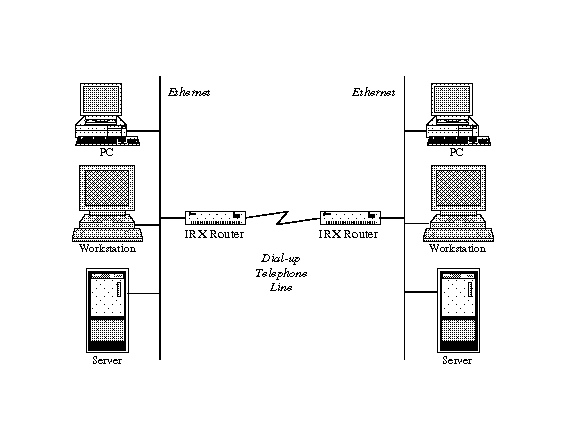
This section describes the steps for connecting two networks together over dial-up or dedicated telephone lines. In a dial-up environment the remote site(s) can be set up in one of three ways:
This section assumes that an IRX will be used at each site, and modems or DSU/CSUs which are compatible with each other will be used. These examples can be used for connecting more than two sites together by simply following the same steps for each additional site
When connecting two sites which have never directly communicated with each other using TCP/IP or IPX it is important to perform some general address administration. The steps for this are:
The IRX should be connected to the local Ethernet network and the installation steps in the Hardware Installation Guide should be followed. A DSU/CSU (Digital Service Unit/Channel Service Unit) should be attached to S1, S2, S3, or S4. Ports S1 and S3 may be used for connections up to T1/E1, ports S2 and S4 have a maximum speed of 64Kbps. When configured at the same speed any of these ports will support multi-line load balancing for improved performance to the remote site(s).
Each DSU/CSU manufacturer supports a wide variety of configuration settings. Consult the manufacturer's manual for proper set up of their product with the following options:
The IRX Ethernet Configuration should be checked. This may be done using the pmconsole program, by connecting a terminal to the S0 port, or by using the telnet application over the network. The figure below is an example of a properly configured Ethernet port:
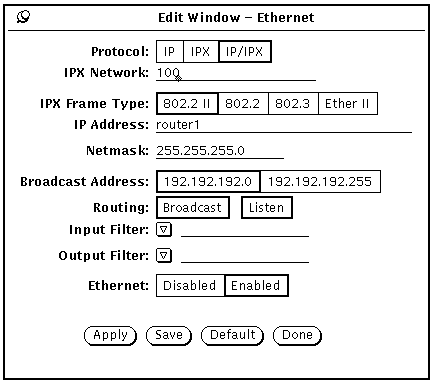
In the figure above the protocol types of both IP and IPX have been selected, The IP address and IPX network number have been assigned, Broadcast and Listen have been enabled for routing, and the Broadcast Address has been set to all zeros (0).
From the Command Prompt Interface the following entries would produce the same result:
Command> set address 192.192.192.1
Local address changed from 0.0.0.0 192.192.192.1
Command> set ipxnet 100
IPX network set to 00000100
Command> set routing on
Routing changed from off (no_broadcast,no_listen) to on (broadcast,listen)
Command> set broadcast low
Broadcast address changed from high to low
Each port with a DSU/CSU attached for use with a standard dedicated circuit from TelCo should be configured as detailed below.
Below is an example configuration:

In the example above the Destination Address and Netmask have been defined. All other values displayed are the factory defaults.
The IRX does not require each port to have its own IP address. The destination address should be the IP address associated with the Ethernet interface of the remote IRX. If router1 has the IP address 1.1.1.1 assigned to its Ethernet interface and router2 has 2.2.2.2 assigned to its Ethernet interface then the following command on router1 will properly set the destination address for the sync port.
From the Command Prompt Interface the following commands would be required to achieve this result:
Command> set s4 dest 2.2.2.2 255.255.255.0
Port S4 destination changed from 0.0.0.0 to 2.2.2.2
Command> set s4 dest 1.1.1.1 255.255.255.0
Port S4 destination changed from 0.0.0.0 to 1.1.1.1
Command> reset s4
Resetting port S4
In a typical installation, once the previous commands are issued the connection is established and the installation of the network illustrated in Figure 3-1 is complete.
Command> save all
Saving global configuration
Saving ports
User table successfully saved
Hosts table successfully saved
Static route table successfully saved
Location table successfully saved
SNMP table successfully saved
Filter table successfully saved
New configurations successfully saved.
The following figure displays the information required to connect the IRX to a Frame Relay network:
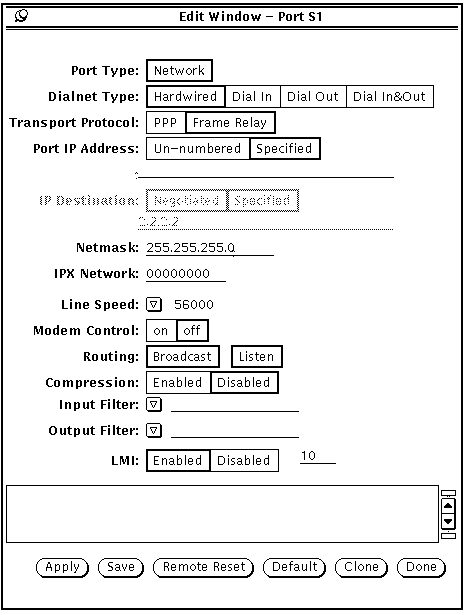
In the pmconsole window the only non-default information displayed is the Transport Protocol and LMI Enabled. When enabling LMI the number 10 automatically appears in the keepalive entry field.
When connecting to a Frame relay network, or `Cloud' there are only two steps required which are different than the Port Configuration discussed in the previous section.
Command> set s1 protocol frame_relay
Protocol for port S1 changed from ppp to frame_relay
Command> set s1 dlci 22:2.2.2.2 23:3.3.3.3
New DLCI List: 22:2.2.2.2 23:3.3.3.3
In the above example, the host 2.2.2.2 is on the 22 PVC and the host 3.3.3.3 is on PVC 23.
The second step is not required if LMI is available on the Frame Relay Switch. If so, simply enabling LMI will cause the DLCI list to be completed automatically. LMI is enabled by specifying the keepalive timer:
Command> set s1 lmi 10
LMI keepalive timer for S1 changed from 0 to 10
LMI is disabled by setting the keepalive to 0:
Command> set s4 lmi 0
LMI disabled for port S1
The keepalive timer is expressed in seconds. Ten seconds is the standard described in the LMI Specification.
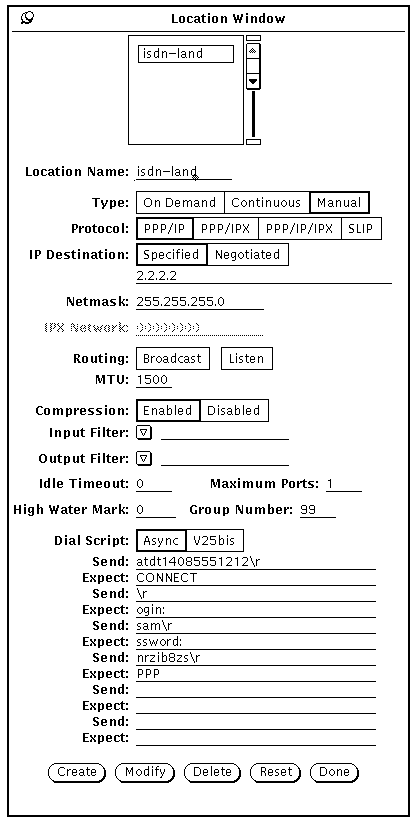
An external Terminal Adapter (TA) is required to connect an IRX to an ISDN link. Some TAs have `Auto-Dial'. For those which do not, or for administrators who do not prefer to manually interface with the TA, the IRX supports V.25bis dialing. The dial script is a part of the Location Table which is displayed below:
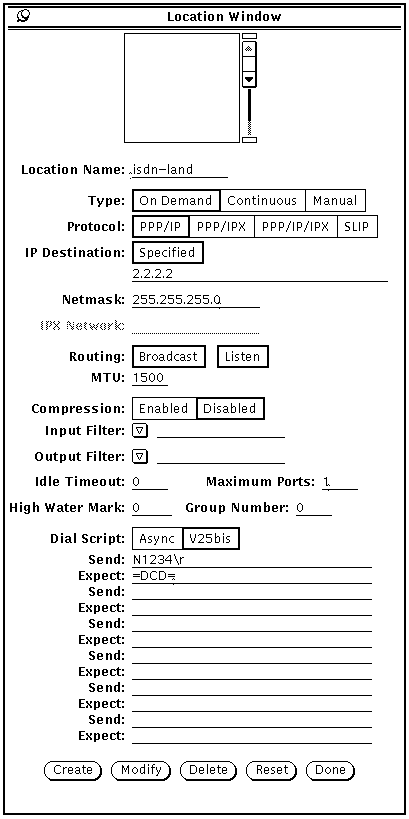
In pmconsole, the only non-default information displayed is the Location Name, the Destination Address, Netmask, Max Ports, and the Dialer Script. To set these values from the Command Prompt Interface:
Command> add location isdn-land
Location isdn-land successfully added
Command> set isdn-land protocol ppp
isdn-land protocol changed to ppp
Command> set isdn-land mtu 1500
isdn-land mtu changed from 1006 to 1500
Command> set isdn-land destination 2.2.2.2
isdn-land destination changed from 0.0.0.0 to 2.2.2.2
Command> set isdn-land netmask 255.255.255.0
isdn-land netmask changed from 0.0.0.0 to 255.255.255.0
Command> set isdn-land script 1 `N1234\r' `=DCD='
New script entry successfully added
Command> show isdn-land
   Location: isdn-land                Type: Manual
 Destination: 2.2.2.2               Netmask: 255.255.255.0
    Protocol: PPP                   Options: Routing
       Group: 0                   Max Ports: 1
Idle Timeout: 0 minutes           High Mark: 0 bytes
         Mtu: 1500                Async Map: 00000000


 Dial Script:   Send Command                    Wait for Reply
                ------------------------------  ------------------------------
N1234 =DCD=Command> save location Location table successfully saved
This section describes the steps for connecting two networks together over dial-up telephone lines for on-demand usage. On-demand means that the IRX automatically dials and establishes the network link when packets are queued for the remote site. This section assumes that a IRX will be used at each site, and modems which are compatible with each other will be used. This example can be used for connecting more than two sites together by following the same steps for each additional site.
When connecting two sites which have never directly communicated with each other using TCP/IP or IPX it is important to perform some general address administration. The steps for this are:
The IRX should be connected to the local Ethernet network and the installation steps in the Hardware Installation Guide should be followed. The modem should be attached to the S0 port on the IRX with a standard modem cable. A 25 pin straight-through cable can be used, although the IRX only uses 8 of these lines. Refer to the hardware guide of this manual for the pin-out diagram. The modem should also be connected to a direct dial telephone line.
Every modem manufacturer supports a wide variety of configuration settings. Experience has shown that the following configuration parameters are the most important, however the modem manufacturer's manual should be carefully reviewed if the following parameters are not sufficient. The modem should be configured as follows:
Refer to your modem vendor's manual for exact register settings.
The following example represents how to set up the S0 port for the purpose of configuring modems:
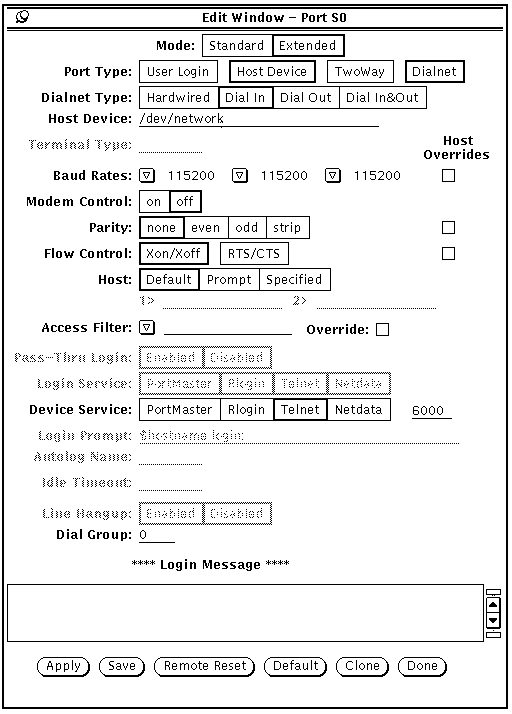
In the previous example, by selecting Extended Mode, Host Device with the Device Service set to Telnet, the IRX S0 port can be used to configure modems. Setting the Host Device to /dev/network is an internal pointer on the IRX and must be filled in. Setting the Telnet Access port to 6000 is arbitrary, any number can be used.
To connect to the port to configure the modem using the Command Prompt Interface, perform the following steps:
Command> set s0 extended on
Extended mode for port S0 changed from off to on
Command> set s0 device /dev/network
Port type for port S0 changed from Login to Host Device(/dev/network)
Command> set s0 service_device telnet 6000
Device Service for port S0 changed from portmaster to telnet
Command> set s0 modem off
CD required for port S0 changed from on to off
Command> set s0 speed 115200
Speed for port S0 (1) changed from 9600 to 115200
Command> reset s0
Resetting port S0
writer @server /home/server/docs 20> telnet router1 6000
Trying 1.1.1.1 ...
Connected to router1.
Escape character is '^]'.
AT
OK
At this point the modem can be configured.
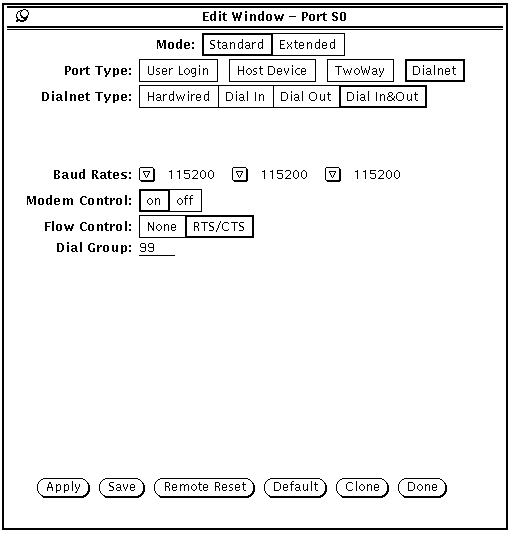
If the async port has a modem attached and will be used for Dialnet connections it should be configured as follows.
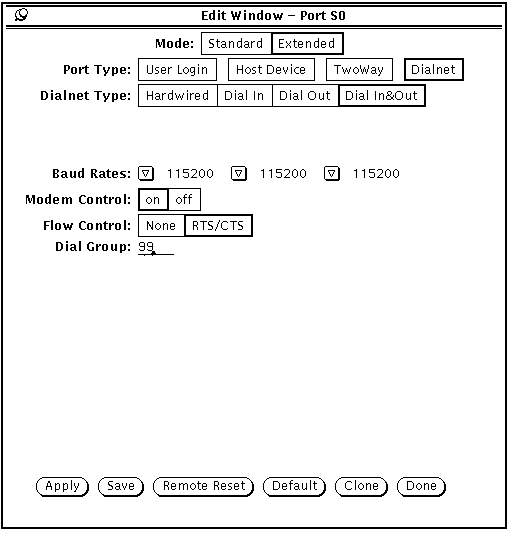
In pmconsole, the following fields need to be set. Dialnet, Dial In&Out, Baud Rates, Modem Control, Flow Control, and the Dial Group. This will allow all the flexibility required for using the S0 port as a WAN port. Refer to `Configuring Modems' earlier in this chapter.
The same results may be achieved with the Command Prompt Interface:
Command> set s0 extended on
Extended mode for port S0 changed from off to on
Command> set s0 network dialin
Port type for port S0 changed from Device to Network(dialin)
Command> set s0 speed 115200
Speed for port S0 (1) changed from 9600 to 115200
Command> set s0 speed 2 115200
Speed for port S0 (2) changed from 9600 to 115200
Command> set s0 speed 3 115200
Speed for port S0 (3) changed from 9600 to 115200
Command> set s0 rts/cts on
RTS/CTS flow control for port S0 changed from off to on
Command> set s0 xon/xoff off
XON/XOFF flow control for port S0 changed from on to off
Command> set s0 modem on
CD required for port S0 changed from off to on
Command> set s0 group 99
Group number for port S0 changed from 0 to 99
Command> save s0
Saving port S0
New configurations successfully saved.
Command> reset s0
Resetting port S0
The port is now ready for use as a WAN port. If there is a need to apply a diagnostic terminal to the port, simply raising DIP switch #1 on the rear of the IRX will restore the port to 9600/8/1/N and User Login.
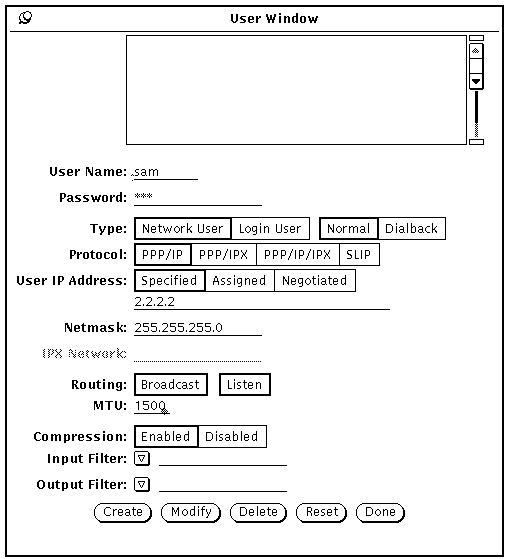
The Users Table is used for all dial-in connections. User entries may be created on the IRX at each site for login security or may be administered from a central location using RADIUS. Below is an example of a User Table entry for a Network User.

In the following it is shown that the keyword netuser need only be used once in order to manage Network users.
Command> add netuser sam
New User successfully added
Command> set user sam protocol ppp
   Username: sam                    Type: Dial-in Network User
    Address: Negotiated          Netmask: 0.0.0.0
   Protocol: PPP                 Options: Quiet, Listen
        MTU: 1006              Async Map: 00000000
Notice in this invocation that the keyword user was used. This is the designed behavior and it works much like the `least-unique' feature. That means the above example could have been typed in as:
se us sam pr ppp
Which is a bit cryptic but can be handy when dealing with many of users and sites. It is also possible with the Users Table to set many parameters at once. This is extremely useful when setting up many sites. In the following example the final User Table parameters are set.
Command> set user sam des 2.2.2.2 netm 255.255.255.0 rout on com on mtu 1500
   Username: sam                    Type: Dial-in Network User
    Address: 2.2.2.2       Netmask: 255.255.255.0
   Protocol: PPP                 Options: Broadcast, Listen, Compression
        MTU: 1500              Async Map: 00000000
The Location Table is used for dialing from a local IRX to a remote site. Following is an example of a Location Table:
To set up a new location:
Command> add location rem-site
Location rem-site successfully added
Command> set location rem-site dest 2.2.2.2
rem-site destination changed from 0.0.0.0 to 2.2.2.2
Command> set location rem-site netmask 255.255.255.0
rem-site netmask changed from 0.0.0.0 to 255.255.255.0
Command> set location rem-site compression on
rem-site header compression changed from off to on
Command> set location rem-site protocol ppp
rem-site protocol changed to ppp
Command> set location rem-site mtu 1500
rem-site mtu changed from 1006 to 1500
Command> set location rem-site max 1
rem-site maximum port count changed from 0 to 1
Command> set location rem-site script 1 `atdt14085551515\r' `CONNECT'
New script entry successfully added.
Command> set location rem-site script 2 `\r' `ogin:'
New script entry successfully added.
Command> set location rem-site script 3 `sam\r' `ssword:'
New script entry successfully added.
Command> set location rem-site script 4 `nrzib8zs\r' `PPP'
New script entry successfully added.
Command> sh location rem-site
    Location: rem-site                 Type: Manual
 Destination: 1.1.1.1               Netmask: 255.255.255.0
    Protocol: PPP                   Options: Routing, Compression
       Group: 0                   Max Ports: 1
Idle Timeout: 0 minutes           High Mark: 0 bytes
         Mtu: 1500                Async Map: 00000000


 Dial Script:   Send Command                    Wait for Reply
                ------------------------------  ------------------------------
                atdt14085551515\r               CONNECT
                \r                              ogin:
                sam\r                           ssword:
nrzib8zs\r PPPCommand> save location Location Table successfully saved New configurations successfully saved.
In the example above the assumption is made that there is an IRX or PM2 on the remote side and that modems using the AT command set are installed. The script is Expect/Send oriented, like that of UUCP. The first line sends the AT string to the modem and `expects' to see CONNECT back from the remote end. The second line sends a carriage return to the distant modem and `expects' to see a login prompt. The third line send the login id for sam and `expects' to see a password prompt. The last line sends the users password and `expects' to see the word PPP. On slow links, or when connecting to products outside the Lucent family, it is often useful to `expect' the ~ (tilde) character because that is the first character in a PPP frame. In this way, it is assured that PPP will not time out waiting for an expect that may take too long to arrive back to the local IRX.
Once the connection is successful verify that the remote IRX is accessible through the network (i.e., `ping' the remote IRX). Verify that a computer at the remote location is accessible (i.e., use rlogin, ping, or telnet).
This section describes the steps for enabling dial-in network connections for remote computers. Users who want to use this type of connection must have software on their workstation or PC which allows them to issue dial commands to their modem, respond to login and password prompts from the IRX for security, and switch over to the SLIP or PPP protocol for sending and receiving TCP/IP or IPX datagrams.
When connecting a remote computer into the network through an IRX, that computer must be assigned valid network addresses. If using TCP/IP a valid IP address must be assigned. If using IPX, a unique network number must be assigned to the user. For example if the user is a TCP/IP user and the IRX is on network 192.200.1 and has the internet address 192.200.1.20, the remote computer should be assigned a free address on the 192.200.1 network (i.e., 192.200.1.21). If the user is an IPX user and the IRX is on network 00001000, the remote computer should be assigned a free IPX network number like 00001002.
The IRX should be connected to the local Ethernet network and the installation steps in the Hardware Installation Guide should be followed. The modem should be attached to the So port on the IRX with a standard modem cable. The modem should also be connected to a direct dial telephone line.
Every modem manufacturer supports a wide variety of configuration settings. Experience has shown that the following configuration parameters are the most important, however the modem manufacturer's manual should be carefully reviewed if the following parameters are not sufficient. The modem should be configured as follows:
Refer to your modem vendor's manual for exact commands.
The following example represents how to set up the S0 port for the purpose of configuring modems:

In the previous example, by selecting Extended Mode, Host Device with the Device Service set to Telnet, the IRX S0 port can be used to configure modems. Setting the Host Device to /dev/network is an internal pointer on the IRX and must be filled in. Setting the Telnet Access port to 6000 is arbitrary.
To connect to the port to configure the modem using the Command Prompt Interface, perform the following steps:
Command> set s0 extended on
Extended mode for port S0 changed from off to on
Command> set s0 device /dev/network
Port type for port S0 changed from Login to Host Device(/dev/network)
Command> set s0 service_device telnet 6000
Device Service for port S0 changed from portmaster to telnet
Command> set s0 modem off
CD required for port S0 changed from on to off
Command> set s0 speed 115200
Speed for port S0 (1) changed from 9600 to 115200
Command> reset s0
Resetting port S0
writer @server /home/server/docs 20> telnet router1 6000
Trying 1.1.1.1 ...
Connected to router1.
Escape character is '^]'.
AT
OK
At this point the modem can be configured.
If the async port has a modem attached and will be used for Dialnet connections it should be configured as follows.
In pmconsole, the following fields need to be set. Dialnet, Dial In&Out, Baud Rates, Modem Control, Flow Control, and the Dial Group. This will allow all the flexibility required for using the S0 port as a Host Dial-Up port. Refer to `Configuring Modems' earlier in this chapter.
The same results may be achieved with the Command Prompt Interface:
Command> set s0 extended on
Extended mode for port S0 changed from off to on
Command> set s0 network dialin
Port type for port S0 changed from Device to Network(dialin)
Command> set s0 TwoWay network dialin
Port type for port S0 changed from Network to TwoWay(Network)
Command> set s0 speed 115200
Speed for port S0 (1) changed from 9600 to 115200
Command> set s0 speed 2 115200
Speed for port S0 (2) changed from 9600 to 115200
Command> set s0 speed 3 115200
Speed for port S0 (3) changed from 9600 to 115200
Command> set s0 rts/cts on
RTS/CTS flow control for port S0 changed from off to on
Command> set s0 modem on
CD required for port S0 changed from off to on
Command> set s0 group 99
Group number for port S0 changed from 0 to 99
Command> save s0
Saving port S0
New configurations successfully saved.
Command> reset s0
Resetting port S0
The port is now ready for use as a Host Dial Up port. If the need to apply a diagnostic terminal to the port, simply raising DIP switch #1 on the rear of the IRX will restore the port to 9600/8/1/N and User Login.
The Users Table is used for all dial-in connections. User entries may be created on the IRX at each site for login security. Below is an example of a User Table entry for a Network User.
In the following it is shown that the keyword netuser need only be used once in order to manage Network users.
Command> add netuser sam
New User successfully added
Command> set user sam protocol ppp
   Username: sam                    Type: Dial-in Network User
    Address: Negotiated          Netmask: 0.0.0.0
   Protocol: PPP                 Options: Quiet, Listen
        MTU: 1006              Async Map: 00000000
Notice in this invocation that the keyword user was used. This is the designed behavior and it works much like the `least-unique' feature. That means the above example could have been typed in as:
se us sam pr ppp
Which is a bit cryptic but can be handy when dealing with thousands of users and sites. It is also possible with the Users Table to set many parameters at once. This is extremely useful when setting up many sites. In the following example the final User Table parameters are set.
     Command> set user sam des 2.2.2.2 netm 255.255.255.0 rout on com on mtu 1500
     Username: sam                    Type: Dial-in Network User
     Address: 2.2.2.2             Netmask: 255.255.255.0
   Protocol: PPP                 Options: Broadcast, Listen, Compression
MTU: 1500 Async Map: 00000000|
© Copyright 1998, Lucent Technologies. All Rights Reserved. Revised Friday June 11, 1999 06:36 PDT [an error occurred while processing this directive] |
[an error occurred while processing this directive] |