[Top] [Prev] [Next] [Bottom]
This chapter includes the following installation topics: desktop installation, rack-mount installation, overview of LEDs, overview of connectors and DIP switches, connecting to the network and console, configuring the Ethernet IP address of the IRX, and adding or removing expansion cards.
Caution ¯  Before you install an Internetwork Router (IRX), read Chapter 2, "Preparing for Installation."
For desktop installation, place the IRX on a desktop, bookshelf or other flat secure surface. Your location should provide clearance of three (3) inches (8 cm) for cabling and airflow.
The IRX can be rack-mounted. Order the kit "RACK-1" from Lucent InterNetworking Systems.
To rack-mount an IRX, order the kit RACK-1 from Lucent InterNetworking Systems and install as follows:
Note ¯  Included with the rack mount unit are four (4) 12-24x1/2" pan head screws and four (4) #4x3/4" sheet metal screws.
1. Lay the IRX upside down on a protected table surface, with the front of the IRX approximately 1/4" over the front edge of the table.
2. Unscrew (counter-clockwise) the black plastic screws that secure the feet to the bottom of the IRX.
-
Retain the feet (and the center expansion sleeve in each foot) in place on the
bottom of the IRX.
3. Turn the rack mount unit upside down and align its four holes with the centers of the holes in the IRX feet.
-
The front of the IRX case sits about 1/8" in front of the mounting shelf flanges.
4. Press (do not screw) each of the #4x3/4" sheet metal screws into the four mounting shelf holes.
5. Turn the unit right side up by lifting from the front and rear of the IRX.
6. Install the unit in the rack with the four 12-24x1/2" pan head screws.
Figure 3-1 shows the back-panel of the IRX-114, with pointers to the three LEDs described in Table 3-1. To verify proper operation, compare the LED descriptions to actual LED behavior. The three LEDs are adjacent to the same ports on all models. In addition, the IRX-211 has a second Link and Network LED next to the second Ethernet.
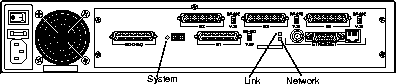
Figure 3-1 IRX-114 LEDs
The rear panel of the IRX provides (left to right and top to bottom):
Figure 3-2 shows the IRX-114 rear panel, with pointers to ports and DIP switches. The IRX-111 and IRX-112 are similar.
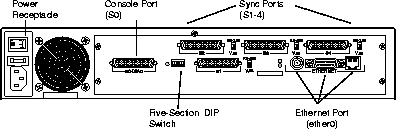
Figure 3-2 IRX-114 Rear Panel
Figure 3-3 shows the IRX-211 rear panel, with pointers to ports and DIP switches.
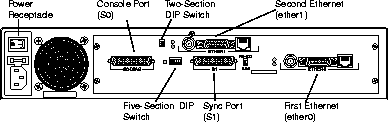
Figure 3-3 IRX-211 Rear Panel
AC power to the IRX is connected using a standard power cable. The IRX uses an auto-sensing, auto-ranging power supply that automatically adjusts to match the input voltage without setting a switch. The IRX operates correctly at any AC voltage from 100V to 260V and frequencies from 50 to 60 Hz.
Caution ¯  Before you apply power, refer to "Safety Recommendations" on page 2-1 and "Power Guidelines" on page 2-4.
To apply power:
1. Attach the power cord to the IRX and to a properly grounded electrical outlet.
2. Set the power switch to the ON position.
To disconnect power:
1. Set the power switch to the OFF position.
2. Detach the power cord from the outlet and the IRX.
To change the fuse:
1. Set the power switch to the OFF position.
2. Detach the power cord from the IRX.
3. Insert a 3/16" flat-head screwdriver between the fuse door and the chassis and gently pry the door open, as shown in Figure 3-4.
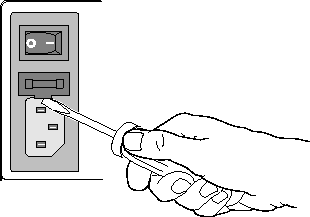
Figure 3-4 Changing Fuses on the IRX
4. Replace the 250V, 2A fuse.
-
The fuse is easily removed and replaced and has no "wrong end."
5. Press the fuse door shut until it clicks.
6. Reattach the power cord to the IRX.
7. Set the power switch to ON.
The IRX has a five-section DIP switch, shown in Figure 3-5:
-
When UP, the IRX boots in diagnostic mode. When DOWN, the IRX boots in
normal mode. Default is DOWN. For information about the diagnostic mode, refer
to "Boot Sequence in Diagnostic Mode" on page 4-5.
-
When UP, the IRX boots from the network using RARP and TFTP. When DOWN, it
boots from internal flash memory. Default is DOWN.
-
For more information about using TFTP to boot the IRX, refer to the PortMaster
Configuration Guide.
-
When both DIP switches are UP, the IRX connects through the 10BaseT Ethernet
port. When both DIP switches are DOWN, it connects through the BNC Ethernet
port. When DIP switch #4 is DOWN and DIP switch #5 is UP, the IRX connects
through the AUI port.
Note ¯  The IRX-211 has two additional DIP switches next to the ether1 port, which select the Ethernet network type for ether1 in the same way DIP switches #4 and #5 do for ether0.
Warning ¯  When changing the position of the Ethernet DIP switches, power must be off.
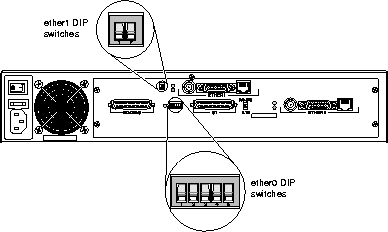
Figure 3-5 IRX-211 DIP Switches
Note ¯  As shown in Figure 3-5, DIP switches #4 and #5 are DOWN, selecting the BNC port for connection to ether0.
The S0 console port is an asynchronous (async) DTE port with a female RS-232 connector:
When connecting a console to port S0, with DIP switch #1 UP, the console should be set to 9600 baud, 8 data bits, 1 stop bit, no parity, Xon/Xoff software flow control.
When DIP switch #1 is DOWN, the S0 port operates as an async port, using its configured settings.
The async port (S0) uses a 25-pin D-type female connector, providing all RS-232 signals under the enhanced RS-423 standard. The connection is configured as a DTE (Data Terminal Equipment).
For cabling specifications, refer to Appendix B, "Cabling Specifications."
Ports S1 and S3 are capable of speeds up to T1/E1. Ports S2 and S4 are capable of speeds up to 64Kbps. Each port has a switch which selects RS-232 (when UP) or V.35 (when DOWN) signalling.
This port is always synchronous and requires an external clock.
For cabling specifications, refer to Appendix B, "Cabling Specifications."
Caution ¯  The synchronous ports will not function as asynchronous ports. Do not connect asynchronous devices to these ports.
The Ethernet 10BaseT port allows you to connect your IRX to a network 10BaseT hub using a straight-through twisted-pair cable with RJ-45 connectors. In order to connect to a 10BaseT network, DIP switches #4 and #5 must both be set to the UP position.
On the IRX-211, ether1 uses the RJ-45 jack if both switches of the two-section DIP switch are UP.
The Ethernet AUI port allows you to connect your IRX to a 10BaseT, 10Base5 or 10Base2 transceiver using a DB-15 connector. In order to connect to a transceiver, DIP switch #4 must be DOWN and DIP switch #5 must be UP.
On the IRX-211, ether1 uses the AUI port if the left switch of the two-section DIP switch is DOWN and the right switch of the two-section DIP switch is UP.
The Ethernet BNC port provides a BNC (round barrel) connector for use with 10Base2 (thinwire Ethernet). In order to connect using the BNC, DIP switches #4 and #5 must be set to the DOWN position.
On the IRX-211, ether1 uses the BNC connector if both switches in the two-section DIP switch are DOWN.
The following procedure walks you step-by-step through the installation of the IRX.
1. Set the power switch on the IRX to OFF.
2. Attach a RS-232 null modem cable to IRX port S0 and the serial port of a PC or ASCII terminal.
Warning ¯  Before you apply power, refer to "Safety Recommendations" on page 2-1 and "Power Guidelines" on page 2-4.
3. Attach the power cord to the IRX and to a properly grounded electrical outlet.
4. Connect the 10BaseT, AUI, or BNC Ethernet port on the IRX to an Ethernet hub or transceiver, using the appropriate cable. For information on switching the Ethernet DIP switches, refer to "Five-Section DIP Switch" on page 3-7.
-
If using an IRX-211, also connect ether1 and set the two-section DIP switch.
The Ethernet cable does not come with the IRX.
5. Set the power switch to ON.
6. Verify that the System LED is active.
-
While the IRX is booting, the LED blinks three times per second, then once per
second. The LED blinks OFF once every five seconds during normal operation.
-
If the System LED does not behave in this way, refer to "Hardware Problems and
Solutions" on page 4-1.
7. Verify that the Link LED is ON.
-
The Link LED comes on blinking once for AUI and twice for 10BaseT. Solid ON
indicates 10BaseT link integrity exists. Solid OFF indicates link error for 10BaseT.
Link LED is not used for the AUI or BNC connectors.
-
If the Link LED does not behave in this way, refer to "Hardware Problems and
Solutions" on page 4-1.
8. Verify that the Network LED is ON when Ethernet traffic is present.
-
The Network LED comes on blinking once for every packet transmitted or
received. In heavy traffic situations, the LED may appear solid.
-
If the Network LED does not behave in this way, refer to "Hardware Problems and
Solutions" on page 4-1.
9. Once the IRX has booted, the console (PC or terminal) displays a login prompt.
10. Enter the address of the Ethernet interface.
a. If you are entering an IP address, type the following, pressing [Enter] after each line. Replace the italicized values with the appropriate values for your network.
b. If you are entering an IPX address, type the following:
11. If you are planning to use the command prompt interface to configure your IRX, do so now. If you are planning to use PMconsole to configure your IRX, you can disconnect the terminal from the S0 port now.
-
For configuration information, refer to the PortMaster Configuration Guide.
Caution ¯  Do not unpack components or open the case of the IRX without using a wrist strap for control of static electricity. Review "Safety Recommendations" on page 2-1.
1. Set the power switch to the OFF position and disconnect the IRX from the AC power source.
2. Open the IRX case.
-
Remove the screw at the center of the top rear edge, then slide the top of the IRX
case forward 1/2" horizontally and lift straight up. If difficulty is encountered in
separating the top and bottom sections of the IRX case, try pressing down on the
top edge sides and exerting a sudden push.
3. Remove the Dsub cover plate(s). If this is a 1-port expansion, remove only the plate covering the S2 port. Otherwise, remove the cover plates for the S2, S3, and S4 ports.
4. Insert the expansion card at a slight angle into the empty Dsub port holes.
-
Align the 40-pin connector projecting from the bottom of the expansion board with
the corresponding connector on the main board. When inserting the 40-pin
connector, support the free edge of the board (the side closest to the front) with
your hand, so that the main board does not bend excessively.
5. Attach the Dsub connectors to the rear face plate with the screws provided.
-
Screw(s) should be partially screwed in and the face plate(s) aligned before
tightening any of the screws.
6. Close the IRX case by reversing the procedure described in step 2.
7. Connect the IRX to the AC power source and set the power switch to the ON position.
Caution ¯  Do not unpack components or open the case of the IRX without using a wrist strap for control of static electricity.
Review "Safety Recommendations" on page 2-1.
1. Set the power switch to the OFF position and disconnect the IRX from the AC power source.
2. Open the IRX case.
-
Remove the screw at the center of the top rear edge, then slide the top of the IRX
case forward 1/2" horizontally and lift straight up. If difficulty is encountered in
separating the top and bottom sections of the IRX case, try pressing down on the
top edge sides and exerting a sudden push.
3. Remove the expansion card.
4. Install the blank cover plates with the original screws.
-
The screws, which mount the expansion face plate(s), should be partially screwed
in and the expansion face plate(s) aligned before tightening any of the screws.
5. Place the expansion board into an ESD bag.
-
Place the bag between foam in a box. The expansion board can now be shipped or
stored.
6. Close the IRX case by reversing the procedure described in step 2.
7. Connect the IRX to the AC power source and set the power switch to the ON position.
[Top] [Prev] [Next] [Bottom]
spider@livingston.com
Copyright © 1998, Lucent Technologies. All rights
reserved.