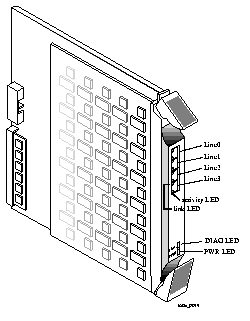
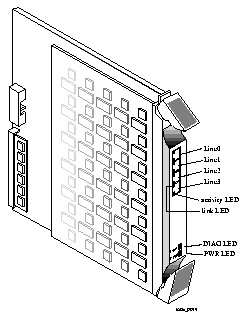
Figure 5-1 Quad T1 Board with Modems
Note ¯ Because ![]() the T1 and E1 boards are hot-swappable, you can install a T1 or E1 board while the PortMaster 4 is turned on and running.
the T1 and E1 boards are hot-swappable, you can install a T1 or E1 board while the PortMaster 4 is turned on and running.
Figure 5-1 Quad T1 Board with Modems
Note ¯ Because ![]() the T1 and E1 boards are hot-swappable, you can install a T1 or E1 board while the PortMaster 4 is turned on and running.
the T1 and E1 boards are hot-swappable, you can install a T1 or E1 board while the PortMaster 4 is turned on and running.
Warning ¯ ![]() To avoid damaging the internal components of the PortMaster 4, follow antistatic precautions by wearing a grounding wrist strap. See "Grounding Wrist Strap Instructions" on page 2-3.
To avoid damaging the internal components of the PortMaster 4, follow antistatic precautions by wearing a grounding wrist strap. See "Grounding Wrist Strap Instructions" on page 2-3.
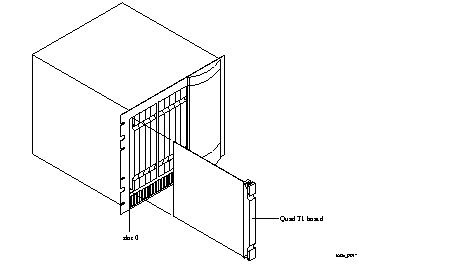
1. Line up the edge of the board with the card guide in any slot except slot 4 (Figure 5-2).
Slots are numbered 0 through 9 from left to right. Slot 4 is reserved for the manager module.
Figure 5-2 Installing a Quad T1 or Tri E1 Board
2. Insert the board in the slot and gently guide it into the slot.
If you have trouble sliding the board into the card guide, gently wiggle it back and forth to help it slide in.
3. When the board is completely inserted in the slot, close the top and bottom tabs so they are flush with the face of the chassis.
Closing the tabs causes the board to connect with the backplane.
4. After you finish installing boards or modules in the PortMaster 4, ensure that every slot contains either a working board or blank board.
o Category 5 twisted pair cables, as specified by the EIA/TIA-568-B wiring standard, with an RJ-45 connector (See "RJ-45 Cable" on page A-2 for more information.)
Warning ¯ ![]() To avoid damaging the internal components of the PortMaster 4, follow antistatic precautions by wearing a grounding wrist strap. See "Grounding Wrist Strap Instructions" on page 2-3.
To avoid damaging the internal components of the PortMaster 4, follow antistatic precautions by wearing a grounding wrist strap. See "Grounding Wrist Strap Instructions" on page 2-3.
1. Remove the cover from the cable guide, if necessary.
2. Run the cable through the cable guide duct until it is directly over the Quad T1 or Tri E1 board.
3. Pull the cable through the fingers of the cable guide duct as shown in Figure 5-3.
Figure 5-3 Pulling a Cable through the Cable Guide
4. Determine whether the line you are connecting has telephone company clocking.
Each Quad T1/PRI board and Tri E1/PRI board has an integrated channel service unit/digital service unit (CSU/DSU). However, the other end of a T1 or E1 connection might require an external clock signal provided by the telephone company or a CSU/DSU.
Lines from the telephone company have telephone company clocking with a stable frequency. However, lines from nontelephone company sources can sometimes shift the frequency of the clock signal they generate and can disrupt the operation of analog modems so that they do not answer calls.
Because each T1 or E1 board uses the clock signal of the first connected port, starting with Line0, for its transmit clock signal that is shared among all its line ports, the device that Line0 is connected to must provide a stable clocking frequency.
If you also have a T3 board installed, you can configure it to provide clocking to the backplane using the set mux backplane-clock enable command. To configure the T1 board to use clocking from the backplace, use the set Line0 clock backplane command. For more information about these commands, see the PortMaster 4 Command Line Reference.
ISDN and hardwired connections are mostly immune to shifts in clocking frequency.
5. Connect lines to the RJ-45 ports of the T1 or E1 board (T1 with modems shown in Figure 5-4).
Ports are labeled Line0 through Line3 on a T1 board and Line0 through Line2 on an E1 board.
Figure 5-4  Quad T1 Board with Modems
6. Verify the following LED behavior:
a. The PWR LED at the bottom of the board is solidly lit.
b. The amber DIAG LED at the bottom of the board blinks three times per second during startup and then stays solidly lit with a 1-second interruption every 5 seconds.
DIAG LED behavior might vary according to the version of ComOS you are running.
c. The green link LED next to the RJ-45 port for each T1 or E1 connection is on when a carrier is present and off when no carrier is present.
d. The amber activity LED next to the RJ-45 port for each T1 or E1 connection is off when a carrier is present and on when no carrier is present.
See "Troubleshooting LED Behavior on a Quad T1 or Tri E1 Board" on page 5-7 if any LED fails to behave properly.
7. If you have finished inserting boards and connecting lines, replace the cable guide cover by squeezing the duct fingers together with one hand, and sliding the cover over the duct fingers with the other.
| A T1, E1, or ISDN PRI line is connected to a T1 or E1 port and the amber activity T1 or E1 LED stays lit. | The PortMaster 4 does not recognize service from the telephone company. | Contact the telephone company. |
| Green link LED and amber activity LED are both lit | · On a PRI line, the D channel might be having problems, or a frame error might have occurred. | |
· On a channelized T1 or E1 line, a frame error might have occurred. | · Use the show W1 command to check for frame errors and correct the clock signal if necessary. | |
| All LEDs fail to light. | Power is not present. | Check the power switch, power cable, outlet, and fuse. For instructions on checking and changing the fuse in the AC version, see "Replacing a Fuse" on page 4-10. Contact Lucent InterNetworking Systems Technical Support if power is not present on the DC version. |
| Amber DIAG LED on a T1 or E1 board does not light. | Board malfunction. | Contact Lucent InterNetworking Systems Technical Support. |
| During startup, the DIAG LED on a T1 or E1 board fails to light, stays lit, or blinks three times per second continuously. | A hardware problem has occurred. | Contact Lucent InterNetworking Systems Technical Support. |
| Immediately after booting, the DIAG LED on a T1 or E1 board stays solidly lit or does not light. This behavior does not refer to the boot sequence, during which the DIAG LED on a T1 or E1 board is not lit for between 5 and 7 seconds. | A component might have loosened during shipping. | Remove the T1 or E1 board from the PortMaster 4 chassis and verify that the SIMM is firmly seated. If the SIMM is seated properly but the problem is not fixed, refer to "Observing Boot Messages" on page 4-3, and boot in console mode. If the boot messages do not suggest a solution, record the information and contact Lucent InterNetworking Systems Technical Support. |
| During operation, the DIAG LED on a T1 or E1 board stays solidly lit or does not light. | A hardware problem might have been caused by an external device. | If the LED stays solidly lit or does not light after you have removed all external devices, contact Lucent InterNetworking Systems Technical Support. |
| An undefined problem occurred at startup, but the cause cannot be determined from LED behavior. | Refer to the solution column. | Try booting in console mode, and observe the boot messages. See "Observing Boot Messages" on page 4-3. If the boot messages do not suggest a solution, record the information and contact Lucent InterNetworking Systems Technical Support. |
Note ¯ ![]() The PortMaster 4 does not support extended data output (EDO) dynamic RAM.
The PortMaster 4 does not support extended data output (EDO) dynamic RAM.
o One socketed SIMM with 72 pins, 70-nanosecond-or-better speeds, and no parity
Warning ¯ ![]() To avoid damaging the internal components of the PortMaster 4, follow antistatic precautions by wearing a grounding wrist strap. See "Grounding Wrist Strap Instructions" on page 2-3.
To avoid damaging the internal components of the PortMaster 4, follow antistatic precautions by wearing a grounding wrist strap. See "Grounding Wrist Strap Instructions" on page 2-3.
1. Enter the following command to turn off power to the T1 or E1 board you are upgrading:
Replace Slot0 with the number of the slot in which the board is installed.
2. Disconnect all connectors from the board.
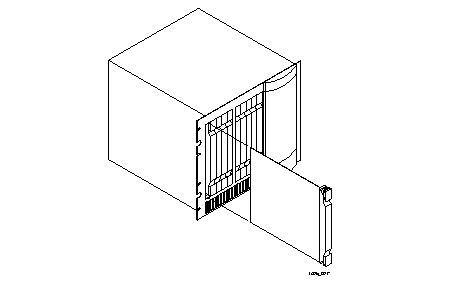
3. Open the top and bottom tabs on the board, and remove it from the slot in the PortMaster 4 chassis (Figure 5-5).
Figure 5-5  Removing a T1 or E1 Board
On the T1 and E1 boards, the socket is located in the rear left quadrant of the board.
5. Pull the levers on either side of the SIMM socket away from the SIMM.
If the SIMM does not pop up on its own, gently pull it up to about a 45-degree angle.
6. Pull the old SIMM out of its socket and put it in a static-free bag.
7. Insert the new SIMM into the SIMM socket.
The SIMM has pin 1 on the left side. Generally, 72-pin SIMMs have a notch that allows them to be inserted only one way. Make sure that the SIMM is completely pushed into the socket.
8. With even pressure, push down on the SIMM until the side levers engage.
The holes on either side of the SIMM must line up with holes in the SIMM socket.
9. Carefully reinstall the board into the PortMaster 4, being careful to close the top and bottom tabs and reconnect all connectors.
See "Installing a Quad T1 or Tri E1 Board" on page 5-2 for detailed instructions if necessary.
10. Enter the following command to turn on power to the board:
Replace Slot0 with the number of the slot in which the board is installed.