Procedure
Warning ¯  To avoid damaging the internal components of the PortMaster 4, follow antistatic precautions by wearing a grounding wrist strap. See "Grounding Wrist Strap Instructions" on page 2-3.
1. Line up the edge of the board with the card guide in any slot except slot 4 (Figure 6-1).
Slots are numbered 0 through 9 from left to right. Slot 4 is reserved for the manager module.
Figure 6-1 Installing a T3 Mux Board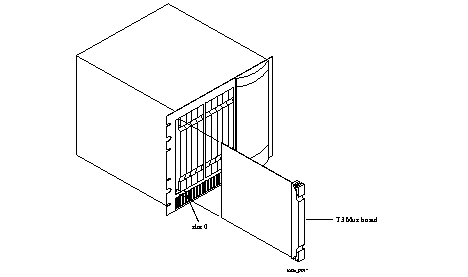
2. Insert the board in the slot and gently guide it into the slot.
If you have trouble sliding the board into the card guide, gently wiggle it back and forth to help it slide in.
3. When the board is completely inserted in the slot, close the top and bottom tabs so they are flush with the face of the chassis.
Closing the tabs causes the board to connect with the backplane.
4. After you finish installing boards or modules in the PortMaster 4, ensure that every slot contains either a working board or blank board.
See "Cover Empty Slots with Blank Modules" on page 2-20.
Required Equipment
o Shielded coaxial cables with 75-ohm impedance and BNC connectors (See "T3 Mux Board Physical Specifications" on page 6-6 for more information.)
Procedure
1. Remove the cover from the cable guide, if necessary.
2. Run the cable through the cable guide duct until it is directly over the channelized T3 Mux board.
3. Pull the cable through the fingers of the cable guide duct as shown in Figure 6-2.
Figure 6-2 Pulling a Cable through the Cable Guide
4. Connect lines to the BNC connectors of the T3 Mux board.
Each T3 connection consists of one transmit line and one receive line. See Figure 6-3 for connector locations.
Figure 6-3 T3 Mux Board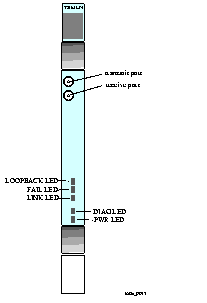
5. Verify the following LED behavior:
a. The PWR LED at the bottom of the board is solidly lit.
b. The amber DIAG LED at the bottom of the board blinks three times per second during startup and then stays solidly lit with a 1-second interruption every 5 seconds.
DIAG LED behavior might vary according to the version of ComOS you are running.
c. The green FAIL LED is not lit.
d. The amber LINK LED is lit.
See "Troubleshooting LED Behavior on a T3 Mux Board" on page 6-5 if any LED fails to behave properly.
6. If you have finished inserting boards and connecting lines, replace the cable guide cover by squeezing the duct fingers together with one hand, and sliding the cover over the duct fingers with the other.